
Squeaks usually come from friction between metal parts, loose bolts, or dry moving joints. Over time, everyday use wears away the thin layer of factory grease inside your chair. Once metal starts rubbing on metal, you hear creaks, pops, and squeaks every time you move. A squeaky chair is rarely “broken”—it almost always needs a quick clean, tighten, and lubricate. The steps below will walk you through the whole process in about 10 minutes.
What You'll Need (Quick Tool Checklist)
Before you start, grab a few basic tools so you do not have to stop halfway through.
- Hex keys (Allen wrenches) and screwdrivers that fit your chair's bolts. A compact Allen key set usually works for most office chairs.
- Lubricant — ideally a dry or silicone-based spray that will not attract dust, such as a silicone spray lubricant.
- For heavier mechanisms, you can also use a white lithium grease spray.
- Clean cloth or paper towels.
- Optional: a basic office chair repair kit if you suspect worn parts.
If you have other problems like a loose base or a chair that sinks, you can follow separate guides such as this article on fixing a wobbly office chair for deeper structural issues.
Step 1: Flip the Chair and Find the Squeak
To fix the noise quickly, you first need to figure out where it is coming from.
- Carefully turn the chair upside down or on its side so you can see the base, mechanism, and underside of the seat.
- Sit or press down on the seat and gently rock it while listening closely.
- Use your free hand to touch different areas (base, tilt mechanism, arm brackets, backrest connection). When you feel vibration or hear the squeak louder, you are close to the source.
Typical noise hotspots are the tilt mechanism under the seat, where the backrest attaches, and at the armrest joints.
Step 2: Tighten Loose Bolts and Screws
Loose bolts are the easiest and fastest squeak fix.
- Locate all bolts under the seat, around the tilt mechanism, and where the backrest and armrests attach.
- Use the correct hex key or screwdriver to tighten each one. Do not overtighten; just make them snug and even.
- Work in a crisscross pattern when tightening the seat plate so the pressure spreads evenly.
- If you find bolts that keep coming loose over time, apply a drop of medium-strength thread locker from a small thread-locking compound and then tighten them again.
After tightening everything, flip the chair back up and test it. If the squeak is gone, you are done. If not, move on to lubrication.

KEZE 92003 Silicone Grease with PTFE,Teflon-Based Lubricant Silicon Grease Tube for Machine Automotive Rubber Seals 3D Printer Plastic Gear Parts Sliding Door Window Track,Plumbing Faucet O Ring 1 oz

WD-40 Specialist Silicone Lubricant with SMART STRAW SPRAYS 2 WAYS, 11 OZ

Lemenyaa Door Hinge Lubricant – 2 OZ Silicone Oil with Built-in Nozzle Storage – Non-Spray, No-Drip Formula for Squeaky Hinges, Locks, Garage Doors, Sliding Tracks & More – Odorless & Rust-Resistant
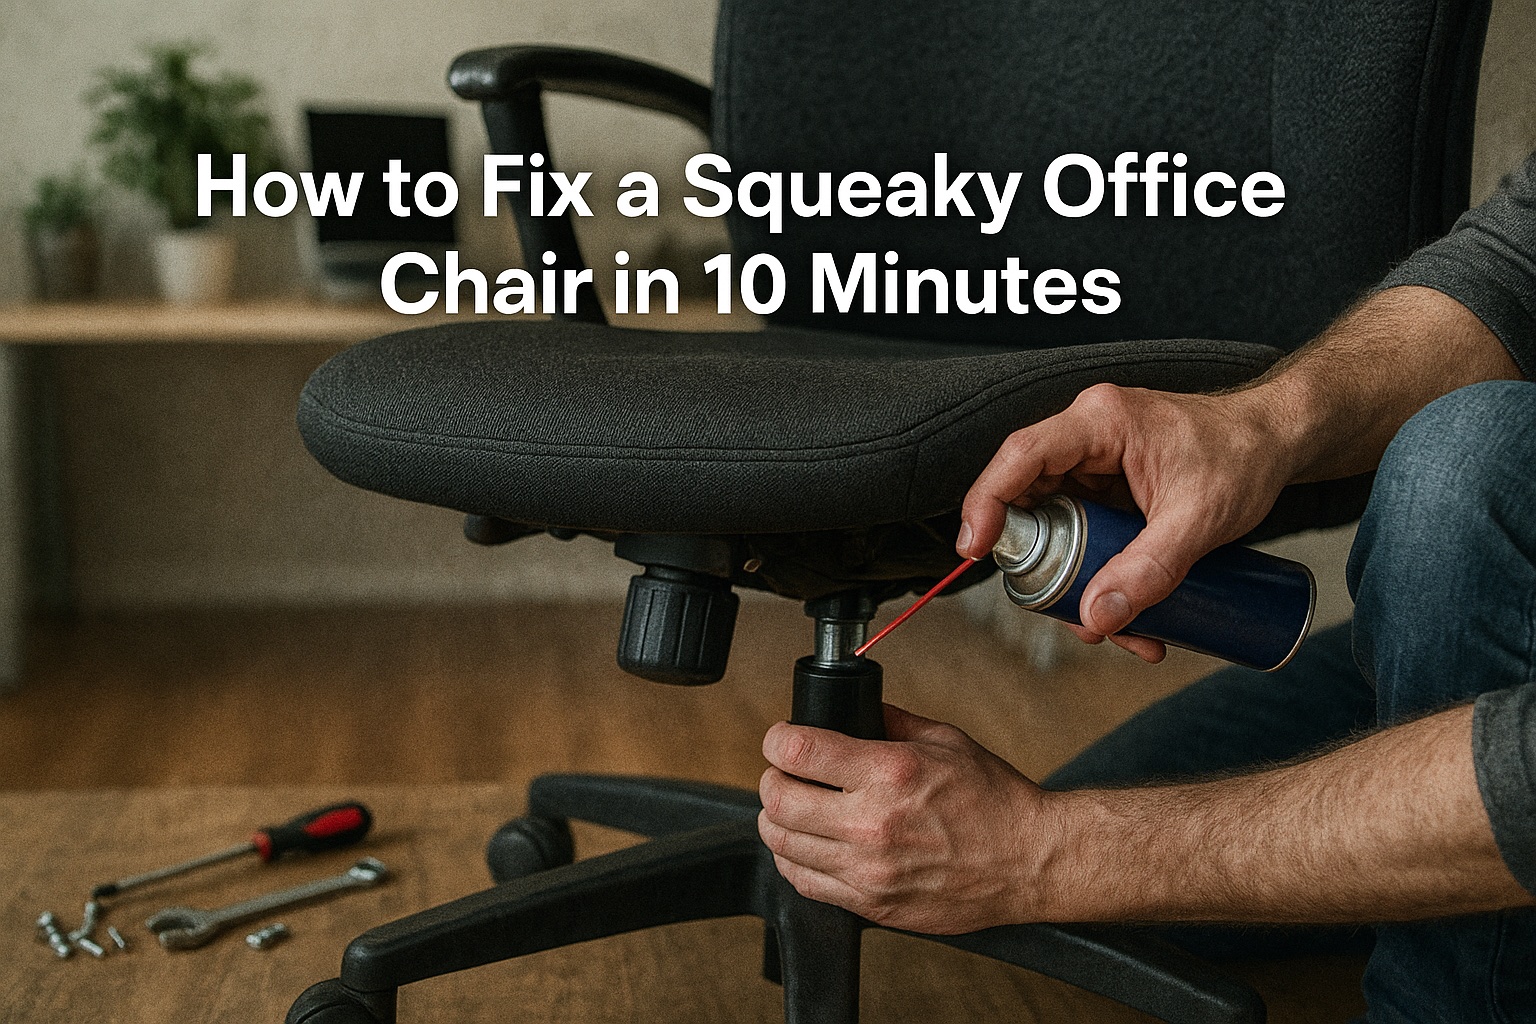
Step 3: Lubricate All Moving Joints
Anywhere two metal parts move against each other is a potential squeak source. A quick spray of lubricant usually solves it.
- Flip the chair back over so you can see the moving parts of the tilt and height mechanism.
- Spray a light amount of silicone lubricant on:
- The pivot points on the tilt mechanism.
- Springs and metal joints under the seat.
- Where the backrest mechanism joins the seat plate.
- Move the chair back and forth, recline it, and rotate it to work the lubricant into the joints.
- Wipe away any excess so it does not drip onto your floor.
Avoid spraying lubricant directly on plastic levers or cosmetic surfaces—focus on the pivot pins and metal-to-metal contact points.
Step 4: Quiet the Gas Lift and Swivel Area
Sometimes the squeak comes from the central column where the chair swivels.
- Locate the area where the gas lift cylinder goes into the mechanism under the seat.
- Spray a small amount of silicone or multi-purpose lubricant around this joint.
- Rotate the chair 360 degrees several times to spread the lubricant evenly.
- If you hear a scraping or grinding sound instead of a squeak, the cylinder or mechanism may be worn and could need replacement.
If your chair is also unstable or leans, combine this step with the advice from the loose base troubleshooting guide so you address both noise and stability at the same time.
Step 5: Fix Squeaky Armrests and Backrest
Armrests and backrests often hide their own noisy joints.
- Check the bolts where the armrests attach to the seat and backrest. Tighten them firmly.
- If the armrests are height-adjustable, apply a bit of lubricant to the inner moving tracks or metal pins.
- For the backrest, lubricate the hinge or bracket where it connects to the seat mechanism, then recline the chair repeatedly to work it in.
- If plastic covers hide the brackets, gently pop them off, lubricate the metal parts underneath, then snap the covers back on.
If you find cracked brackets or damaged armrests, you may need replacement parts. Many chairs use fairly standard hardware that you can match using an office chair armrest replacement search.
Step 6: Check the Casters and Base
Although squeaks usually come from the upper mechanism, sometimes the wheels or base are to blame.
- Spin each caster by hand. If you hear squeaking or grinding, add a tiny drop of lubricant to the wheel axle.
- If a wheel still squeaks or feels rough, consider upgrading to rollerblade-style replacement casters that roll more smoothly.
- Inspect the base for cracks or flexing. A damaged base can creak under load and should be replaced for safety.
For a deeper walkthrough on base problems, check the related article on diagnosing a loose base.

The Office Oasis Original Rollerblade Office Chair Wheels (As Seen On PBS) - Incredibly Smooth & Quiet Casters - Safe for Hardwood Floors & Carpet - Easy Installation with Universal Fit - Set of 5

RidRed Office Chair Wheels - Replacement Rubber Wheels - Universal Fit 3 Inch Casters, Heavy-Duty Chair Casters, Noise Free, Fits 98% Chair, for All Floor (5)

The Office Oasis Original Rollerblade Office Chair Wheels (As Seen On PBS) - Smooth & Quiet Casters - Safe for Hardwood Floors & Carpet - Easy Installation with Universal Fit - Set of 5 - Black
When You Should Replace Parts Instead of Lubricating
Lubricant fixes most squeaks, but not all.
- If a spring is visibly stretched or deformed, it is better to replace the mechanism than to keep greasing it.
- If the gas lift sags, hisses, or feels rough when you move, a new gas lift cylinder is a longer-term fix.
- Cracked metal or plastic components should never be patched with tape or glue—replace them with proper parts or a complete repair kit.
If you are not sure whether to repair or replace, compare the cost of parts against the price of a new chair and the original quality of your current one. For serious structural issues, you might also want to combine this fix with guidance from other problem-specific resources on fixing a sinking office chair.
How to Keep Your Chair Quiet in the Future
A quick 5-minute checkup every few months will keep your chair silent and smooth.
- Retighten bolts on the seat plate, backrest bracket, and armrests.
- Lightly reapply silicone lubricant to key moving joints.
- Keep your chair clean; dirt and dust act like sand between moving parts.
- Avoid using heavy, oily grease that attracts dust and turns into sticky sludge over time.
Besezx Leather Repair Patch Tape Kit,Vinyl Repair Kit,Self Adhesive Leather Repair for Furniture, Couch, Sofa, Car Seats,Office Chair.3.1inx60in-Black

Salbree Office Chair Hero Fix Attaches Clamps to Large Cylinder Piston Stops Your Chairs from Sinking When Computer Hydraulic Lift Has No Gas Stop Replacement
Office Chair Cylinder Replacement with Removal Tool (As Seen On PBS) - Heavy Duty Pneumatic Gas Lift Piston for Desk Chairs and Gaming Chairs - Universal Fit
Summary
Fixing a squeaky office chair does not have to be a big project. With a basic tool kit, a suitable spray lubricant, and 10 minutes of your time, you can silence most noises and make your chair feel almost new again.
If your chair also wobbles, sinks, or leans, tackle those issues next using focused guides like the ones on an office chair gas lift replacement guide, and you will extend the life of your favorite chair for years.

